
Efficiency is everything in competitive digital sales environment. If your team spends hours switching between CRM dashboards, email tabs, and spreadsheets, you are losing valuable time — and probably deals. Constant switching reduces productivity and affects business outcomes. That is where Streak CRM comes in and provides a solution for customer management requirements.
Unlike traditional CRMs, Streak works directly inside Gmail, helps you track leads, manage follow-ups, and close deals without leaving your inbox. In this guide, we will walk you through how to set up a powerful sales workflow in Streak CRM, step-by-step — and you will get a ready-to-import pipeline template at the end.
What Is Streak CRM?
Streak CRM is a customer relationship management tool built natively into Gmail.
It transforms your inbox into a fully functional sales engine, allowing you to:
- Track emails and check who opened them.
- Organize leads into visual pipelines to make the sales process clearer and simpler.
- Automate follow-ups process to ensure timely communication.
- Collaborate with your team in real time to contribute together without any delays.
- Send personalized bulk emails via Mail Merge. It helps to make each email personal for each person.
For small and mid-sized sales teams — or solo founders — Streak offers all the power of a CRM, removes the complexity.
Also Read: Compliance Training Management Tricks and Tools for Employees
Step 1: Create Your Sales Pipeline
After installing Streak (via the Streak Chrome Extension),
Click the Streak icon in Gmail → New Pipeline → Sales / Business Development.
Give your pipeline a clear name to identify, such as:
“Sales Pipeline – [Your Company Name]”
This is where you will track every lead, business opportunity, and deal from first contact to closure.
Step 2: Define Your Sales Stages
Each stage represents a milestone in your sales process.
Here is a proven 7-stage sales workflow you can use right away:
| Stage | Description |
| Lead In | New inquiry or contact added manually or automatically from an email |
| Contacted | Initial outreach made (email or call) |
| Demo / Meeting Scheduled | Schedule of product demo or discovery meeting booked |
| Follow-up | Waiting for client response or second contact |
| Negotiation | Pricing, contract, or terms discussion |
| Verbal Commit | Client verbally agrees to proceed |
| Closed Won / Lost | Deal successfully closed or lost |
💡 Pro Tip: Colour-code each stage for quick visual tracking in Streak.
Step 3: Add Columns to Track Key Sales Data
Columns in Streak help you capture the most important details about each sales opportunity.
Here is a recommended setup:
| Column | Purpose |
| Company Name | Lead’s company or organization |
| Contact Name | Primary contact person |
| Contact’s email address | |
| Phone | Contact number |
| Deal Value | Estimated revenue from the deal |
| Product / Service | What the client is interested in |
| Last Contacted | When you last reached out |
| Next Step | Action to take next |
| Close Probability (%) | Likelihood of closing the deal |
| Notes | Internal notes or background |
| Assigned To | Team member handling the lead |
| Follow-up Date | Reminder for next outreach |
This structure keeps your team organized and ensures no lead slips through the cracks.
Step 4: Add Leads and Track Conversations
You can add leads to your pipeline manually or directly from Gmail.
When you receive a new inquiry:
- Open the email.
- Click “Add to Pipeline.”
- Choose your sales pipeline and stage (“Lead In”).
From that point, every email exchange will automatically appear inside the Streak box for that contact — keeping communication history clear and searchable.
Step 5: Automate Follow-ups and Track Emails
One of Streak’s most powerful features is email tracking.
You’ll see exactly when a lead opens your email — and how many times. This helps you follow up strategically (and avoid guessing).
Use Mail Merge to send personalized bulk emails, such as:
- “Thank you for your interest”
- “Follow-up on our demo”
- “Special offer reminder”
Combine this with reminders and snippets (templates) to make your workflow 100% efficient.
Step 6: Collaborate and Analyse
If you work with a team, Streak makes collaboration simple:
- Share pipelines with teammates to make more transparent.
- Comment on deals directly in Gmail.
- Assign owners to specific leads to handle further.
Then, use Streak’s built-in reports to analyse:
- Win/loss ratios
- Stage conversion rates
- Average deal size
- Pipeline value
You can even export everything to Google Sheets for deeper analysis.
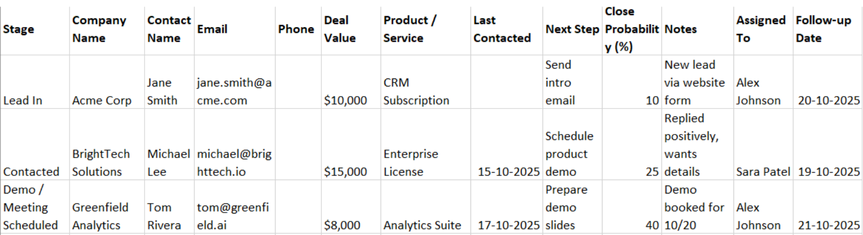
Step 7: Sales Pipeline Template
This template includes:
- Predefined stages (Lead In → Closed Won/Lost)
- Key sales columns (Company, Deal Value, Next Step, etc.)
- Example data for quick testing
You can import it directly into your Streak account to start tracking leads immediately.
Also Read: Customer Satisfaction: The Key to Business Success
Example of a Daily Sales Routine Using Streak
| Time | Task | Tool |
| 9:00 AM | Check email tracking — who opened your outreach | Email Tracking |
| 10:00 AM | Move leads to “Contacted” or “Demo Scheduled” | Pipeline |
| 2:00 PM | Send follow-up emails via Mail Merge | Automation |
| 4:00 PM | Add new leads from inquiries | Add Box |
| 5:30 PM | Review progress and deal stage updates | Reports |
Consistency is key for marketing strategy. Streak makes it easy to stay on top of every touchpoint without switching apps.
Final Thoughts
A sales CRM does not have to be complicated. It can be simple and easy to use.
With Streak CRM, your Gmail becomes your control centre for managing leads, build relationships, and closing deals faster.
By implementing this workflow, you will get these results:
- Streamline your sales process simple and smooth.
- Improve team coordination to make work process effective.
- Gain full visibility into your pipeline regarding all ongoing processes.
- Close more deals with less effort and reduce the workload.
So, install Streak, import the template, and start converting your inbox into a sales powerhouse today.

Tabassum Shaik is a writer, storyteller, and SEO specialist with over 8 years of experience in startup storytelling, business content, and search engine optimization. She focuses on creating simple, practical, and inspiring content for aspiring entrepreneurs.